


How to Remove a Car Battery Safely Step by Step
If you’re wondering how to remove a car battery, start with the cable order. On a conventional negative-ground vehicle, remove the negative cable first, followed by the positive cable, the hold-down, and any remaining attachments. Lift the battery out upright, and when you put it back in, secure it before reconnecting positive first and negative last.
Before you pick up a wrench, check where the battery sits and what your car’s manual says about removing it. Some are easy to reach, while others hide beneath trim or come with extra shutdown and replacement steps. A few minutes spent checking now can save you from getting halfway through the job and finding you cannot finish it.
To remove a car battery from a conventional negative-ground vehicle, follow its shutdown instructions, disconnect and secure the negative cable, then the positive cable, and release the hold-down. Detach any vent tube as directed before lifting the battery upright with a suitable carrier. These general steps apply to an accessible 12-volt lead-acid battery. Other battery types, multiple-battery systems, and special electrical arrangements need their own service procedure.
Disconnecting a Battery Is Not the Same as Removing It
You can disconnect a battery and leave it sitting in its tray. Taking it out is a separate step, because a bracket, strap, vent tube, or other attachment may still be holding it in place. If you’re disconnecting power for a different repair, follow the instructions for that repair rather than treating battery removal as a complete electrical-isolation procedure.
Check the Vehicle Before Reaching for a Wrench
Find the actual battery before taking anything apart. The jump-start posts under the hood may connect to a battery somewhere else in the car. If reaching it means removing a seat, working through a wheel well, or moving unfamiliar electrical parts, get the model-specific instructions or have a shop do the job.
This guide covers an accessible 12-volt lead-acid battery in a conventional negative-ground vehicle. It is not a removal procedure for lithium low-voltage batteries, 48-volt systems, or hybrid and EV traction batteries. A hybrid or EV’s auxiliary battery may also require model-specific shutdown instructions.
Switching off the ignition does not always mean the car’s electronics have finished shutting down. This manufacturer’s battery-removal procedure includes a waiting period and explains what needs restoring afterward. Check those details for your own car instead of copying a delay or reset from another model.
Before disconnecting, make sure you can still access anything you need with power off. That may include the trunk where the battery sits or the vehicle’s mechanical door key. Photograph the cable routing, hold-down, and any vent connection so you have a useful reference later.
Do not attempt routine removal of a battery that is swollen, leaking, cracked, frozen, unusually hot, hissing, or giving off a strong rotten-egg odor. Move away and arrange qualified assistance. For an intact battery, wear splash goggles and chemical-resistant gloves, remove metal jewelry, and keep flames, cigarettes, and sparks away. Never disconnect a battery with the engine running.
Tools and Supplies to Have Ready
Try the wrench or socket on the fasteners before you disconnect anything. The cable clamps and hold-down may need different sizes, and a low-mounted bracket may need a socket extension. Use the sizes and tightening specifications for your car instead of assuming one tool fits every battery.
Before-you-start supplies
- Splash goggles, chemical-resistant gloves, and protective clothing.
- Correctly sized wrenches or sockets for the cable clamps and hold-down.
- A suitable battery carrier or an intact lifting handle approved for the battery.
- Nonconductive covers and a safe way to secure disconnected cable ends.
- A stable, level, acid-resistant surface or tray for the removed battery.
- The vehicle’s removal instructions and specified tightening torques for reinstallation.
Do You Need a Memory Saver?
A memory saver is not something to plug in automatically before every battery change. It can keep the disconnected vehicle cables energized, which changes how you need to handle them. Use one only when you have an approved procedure for your vehicle and understand the extra precautions.
Without backup power, saved settings or certain learned functions may need restoring. That does not mean every vehicle needs a memory saver or the same reset sequence. If the manufacturer’s instructions are unclear, have a shop handle the removal rather than improvising a power supply.
Which Battery Terminal Comes Off First?
For a conventional negative-ground vehicle, negative comes off first. The negative connection is tied to the body and engine, so a wrench touching the positive post and grounded metal can complete a short circuit while that connection remains intact. Removing negative first reduces that risk.
The battery itself still has power after the cables are removed. A wrench laid across both posts can cause a short, so keep tools off the case throughout the job. The manufacturer’s terminal-disconnection guidance also explains how to identify the connections and keep loose cable ends out of the way.
Look for the molded minus and plus markings on the battery. Red and black are common cable colors, but markings and the vehicle’s instructions should settle the identification. If polarity or grounding is uncertain, stop before loosening a clamp.
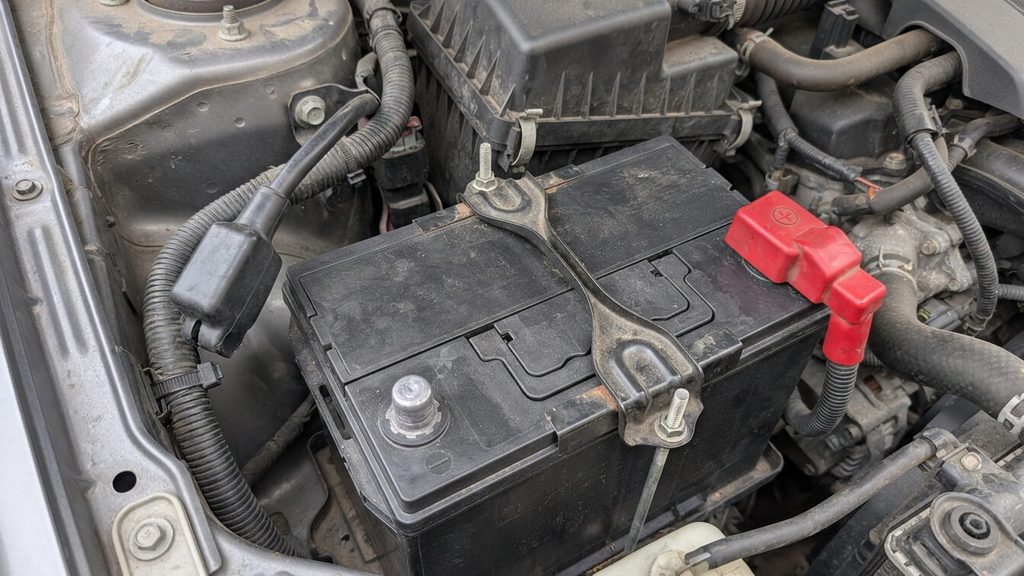
How to Remove a Car Battery Step by Step
Read through the steps before you loosen the first clamp, and clear a stable place to set the battery down. This sequence is for an intact, accessible top-post battery with ordinary clamps and no special isolation requirements. Follow your vehicle’s own procedure wherever it differs.
- Park and shut the vehicle down. Park securely on level ground, apply the parking brake, and switch off the ignition and accessories. Let hot components cool, follow the required shutdown wait, and disconnect any charger or external supply according to its instructions.
- Confirm polarity and access. Locate the minus and plus markings. Remove protective covers only as needed, note cable routing, and keep tools off the battery case.
- Remove the negative cable. Loosen its clamp fastener just enough to release the clamp; full bolt removal may not be necessary. Lift the clamp off without twisting the battery post. Insulate and secure the cable end away from the posts.
- Remove the positive cable. Loosen and lift its clamp, keeping tools clear of other terminals and metalwork. Insulate and secure this cable separately so it cannot contact a battery post during lifting.
- Release the battery hold-down. Remove the upper bracket, retaining strap, or lower retaining clamp as specified. Keep the hardware together and check for a lower mounting lip that still holds the battery.
- Detach any remaining connections as directed. If fitted, carefully disconnect the battery’s vent tube before lifting. Follow the service procedure for any sensor, fuse assembly, cover, or additional connection; never pull on wiring to gain clearance.
- Lift the battery upright. Use a suitable carrier or approved intact handle, following the battery maker’s lifting instructions. Check the route out of the tray before lifting steadily without catching cables or tilting the case. If the reach or weight makes the lift awkward, stop and get help.
- Set it down safely. Place the battery upright on the prepared stable surface, protect the terminals from metal objects, and keep children and pets away. Inspect the empty tray and retain all mounting parts.
Do not pick up the battery by its terminals or cables. Avoid squeezing the case for a better grip; excessive pressure on the plastic case walls can force acid out through vents. A proper carrier is especially useful when the battery sits low in the engine bay and leaves little room for your hands.
Wash your hands after removing your gloves and keep contaminated tools away from household items. The battery-care safety guidance warns that posts and related parts can contain lead compounds. Keep the battery upright and do not open a sealed case.
If a Clamp Is Stuck or the Battery Will Not Lift
If a clamp will not come off, do not lever it against the battery case. Check that you have loosened the correct fastener and released the clamp as intended; you may need a suitable terminal puller. Stop if the post moves in the case, the clamp is damaged, or removing it would require force.
Heavy crust may need controlled cleaning before you can handle the connection properly. The guide to removing corrosion from car battery terminals explains the precautions and when cleaning should give way to repair. Avoid dry scraping that scatters residue, and do not try to clean away a leaking post seal.
If both cables are clear but the battery will not lift, something may still be holding it down. Look for a lower retaining clamp, a mounting lip, or a vent tube or cable caught behind the case. Find the obstruction before pulling harder.
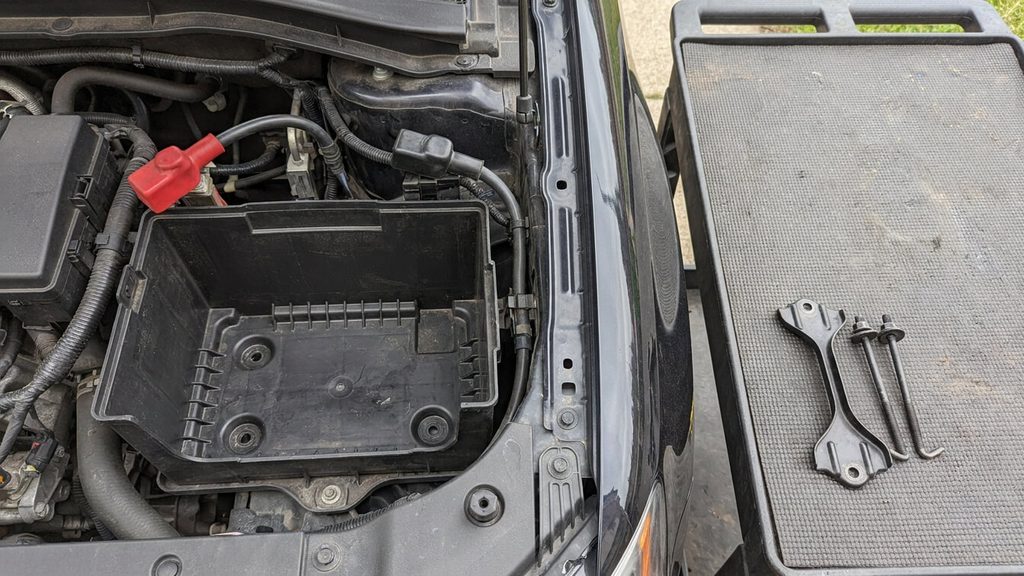
How to Remove and Install a Car Battery
Before installing a replacement, confirm the correct size, terminal layout, capacity, starting rating, battery technology, and vent arrangement for the vehicle. A battery that fits in the tray is not automatically the right replacement. The manufacturer’s battery-installation guide explains why fitment, polarity, and the specified tightening torque matter.
- Check the tray and connections. Address corrosion or damaged clamps before fitting the battery. Keep the contact surfaces clean and dry.
- Seat and secure the battery. Match the correct terminal orientation, engage the mounting lip, and install the hold-down to the specified torque. Restore the vent tube and vent configuration as instructed.
- Connect positive first. Seat and tighten the positive clamp to its specified torque, then restore its protective cover.
- Connect negative last. Seat and tighten the negative clamp without straining any integrated battery sensor or cable assembly.
- Complete the vehicle-specific checks. Refit covers, remove tools, and follow the required relearn or battery-registration procedure. Start the vehicle only after the installation is complete and exhaust ventilation is adequate.
Check the Installation Before Starting
Make sure the battery is seated in its tray and held securely by the correct bracket. Confirm that the cable clamps are fully seated and tightened to specification, the positive cover is back in place, and any vent tube is correctly reconnected. Cables should follow their original route without being stretched or trapped, and all tools and loose hardware should be accounted for.
If a clamp still moves after being tightened to specification, do not start the car and hope it will hold. More force can damage the clamp or post, and the hold-down should not be used to make the wrong battery fit. Correct damaged or mismatched parts before using the vehicle.
Does the New Battery Need Registering?
Some vehicles need a replacement battery registered with the battery management system, which monitors battery condition and charging. Others use a self-learning system. The manufacturer’s explanation of battery registration describes different approaches, but you must confirm the requirement for your exact model.
Putting the same battery back in and installing a new battery may require different steps. Check which instructions apply, and avoid using a reset sequence meant for another car. If warnings or unusual operation remain after the specified setup, get them checked rather than assuming they will clear on their own.
What to Do With the Battery After Removal
If you removed the battery because the car would not start, test it before buying a replacement. A discharged battery, a poor connection, or another starting-system problem can cause similar symptoms. The guide to testing a car battery with a multimeter explains what a voltage reading can tell you and why a proper health test may still be needed.
For recycling, follow the retailer’s instructions and keep an intact battery upright, secured against movement, and protected from terminal contact during transport. Ask for advice before moving a damaged or leaking battery yourself. The automotive battery disposal guidance directs lead-acid batteries to battery retailers or appropriate collection programs, rather than household trash or curbside recycling.
Conclusion
The main thing to remember when learning how to remove a car battery is the order: negative off first, positive off second, then release the hold-down and any remaining attachments. Keep the battery upright as you lift it, and never force a clamp or a battery that will not move. When reinstalling, secure the battery, connect positive first and negative last, and complete your car’s required checks.
Frequently Asked Questions
Can I remove a car battery myself?
You may be able to remove an intact, accessible conventional 12-volt battery if you have the right tools and can follow the vehicle’s procedure. Difficult access, unfamiliar electrical assemblies, or required programming can change the job. Arrange service if you cannot safely disconnect, lift, or reinstall it.
How long should I wait before disconnecting the battery?
Use the waiting period specified for your vehicle. Some systems stay powered after the ignition is switched off, so a universal waiting time is not reliable. Check the instructions before starting rather than copying a delay from another model.
What happens if I disconnect the positive terminal first?
On a negative-ground vehicle, a tool touching the positive post and grounded metal can create a short while negative remains connected. That is why the ground connection comes off first. Even afterward, never bridge the battery’s two posts with a tool.
Will removing the battery erase my car’s settings?
Some settings or learned functions may need restoring, depending on the vehicle. Check its instructions before disconnecting rather than assuming every model behaves the same way. Use backup power only under an approved procedure, because it changes the electrical precautions.

